Anatomy Of A Zwift FTP Test
An FTP test is a critical element towards building an endurance training plan. Let’s start off by first explaining what it is- FTP stands for functional threshold power which is 95% of your best 20 min power/heart rate average. The term “functional” is used because 95% of your LT (lactate threshold) is the most optimal gauge for roughly estimating your one hour power. LT is the threshold where aerobic (your body’s ability to consume O2 and deliver it to the heart and muscles) and anaerobic (lack of O2 delivery to the heart and muscles) meet and is the hardest pace that you can maintain without having to back off and recover. This is also known as your “maximal steady state” or “race pace”. Your FTP can be trained by specifically training above and below your FTP to push a higher % of your VO2 max which is the best way to improve high-intensity fitness. I recommend my athletes start the program with an FTP test to establish a baseline and then re-test every 3-6 months to monitor improvements.
Let me warn you- there is nothing fun about taking this test other than when it’s over. The harder you push, the higher the numbers, therefore the higher the parameters that we set for training. I recommend doing the test in the environment that you train the most, so if you train predominantly indoors on Zwift it is best to do the test indoors on Zwift, and if you train mostly outdoors then I recommend doing the test outside on a 5% gradient consistent climb with minimal traffic. Since I train both indoors and outdoors it is advantageous to do a test inside and outside so I have accurate numbers depending on which environment I am training in. I have only done an FTP test outside so it was due time to perform a test inside on Zwift (plus it’s a killer workout and perfect way to maximize a cold and snowy day in Colorado).
HOW TO PREPARE FOR THE TEST:
Be Rested-
The most important and often overlooked part of taking an FTP test is being fully rested going in. I recommend taking 3-4 days off and/or easy recovery rides depending on your level of fatigue coming out of your last training block. Being appropriately rested will allow for higher numbers and the higher the bar you will set for future training.
Be Focused-
I treat these tests just like I would when preparing for a race. I take my time getting ready, eat 2-3 hours before, pre-hydrate, apply large amounts of Amp PR Lotion, and drink Carbo Rocket Rocket Red Beet Juice w beta-alanine about 30-45 minutes prior.
Have A Bulletproof Mindset Going In-
These tests are absolutely brutal and will push you to your limit and beyond and it is not uncommon to see a max heart rate at the end. At some point, your mind will want to quit so you need to be mentally prepared to face these demons when they arise. Equally as important as the data from the test is the mindset training you get from finishing. A never give up attitude is key and motivation to suffer must be high going in. As painful as the test is, it feels so good to be done and know that you gave it your all and completely emptied the tank. You will have a new appreciation for what your greatest perceived exertion is that you can pull from in future training and races.
Get A Really Good Warm-Up-
This is crucial as you don’t want to use too much energy warming up that takes away from your test, but also don’t want to not warm up enough that you feel flat during your test. This is one of the main reasons I like the Zwift test because it has a very thorough warmup that specifically prepares you for the demands of the test by ramping up the power to 110% of your FTP by setting your FTP in the program ahead of time (if you don’t know your FTP I can help you estimate). After a progressive 40 minute warm-up you are ready to go!
Play Some Killer Music-
I did my college senior seminar project on the effect that music has on perceived exertion and I concluded that specific high energy music can increase your perceived intensity by 5-10%. I compare the effects similar to drinking caffeine prior to a race or training ride. It makes going hard feel easier and encourages you to push harder. While I’m not condoning playing music while riding outside, the beauty of testing indoors is you can crank some loud music to help you get into the zone before and during the test. CRANK IT LOUD!
Have A Good Cooling Device-
This is key as dehydration and an increase in your core temp can cause an increase in heart rate and have a decrease in blood plasma levels and stroke volume which can cause a decrease in power output. Pre- hydrating with electrolytes and having a good fan pointed straight at you will help minimize these effects and keep your engine running cool so you can continue to dig deep and crush those precious watts!
Pace Yourself-
The harder you go in the beginning, the slower you will go in the end. It’s similar to a checks and balances theory- every time you go anaerobic and VO2 max you will have to pay for this lack of O2 by recovering beneath your LT. This will affect your overall power output and you will be chasing your power the rest of the test. I recommend pushing a power profile you think you can hold for 10 minutes and then reevaluating this power at the 10 min mark, increasing by 5-10 watts, and then increasing another 5-10 watts for the last 5 minutes. KISS principle- DON’T GO OUT TOO HARD!
Have A Coach-
Most of my athletes do these tests at my house so I can coach them through the process. Typically, between 10-15 minutes in the body starts to decrease power output. Then for the final 5 minutes, it ‘s full on survival mode. It really helps to have someone in your corner to coach you through this part, help with proper pacing, and motivate you through the last 5 minutes when you want to give up. At this point, we are trying to squeeze out every last watt and heartbeat, completely emptying the tank. You know you’ve done a good test when you can barely turn the pedals over after and feel like you’re going to fall off the bike. FULL LACTATE BATH!
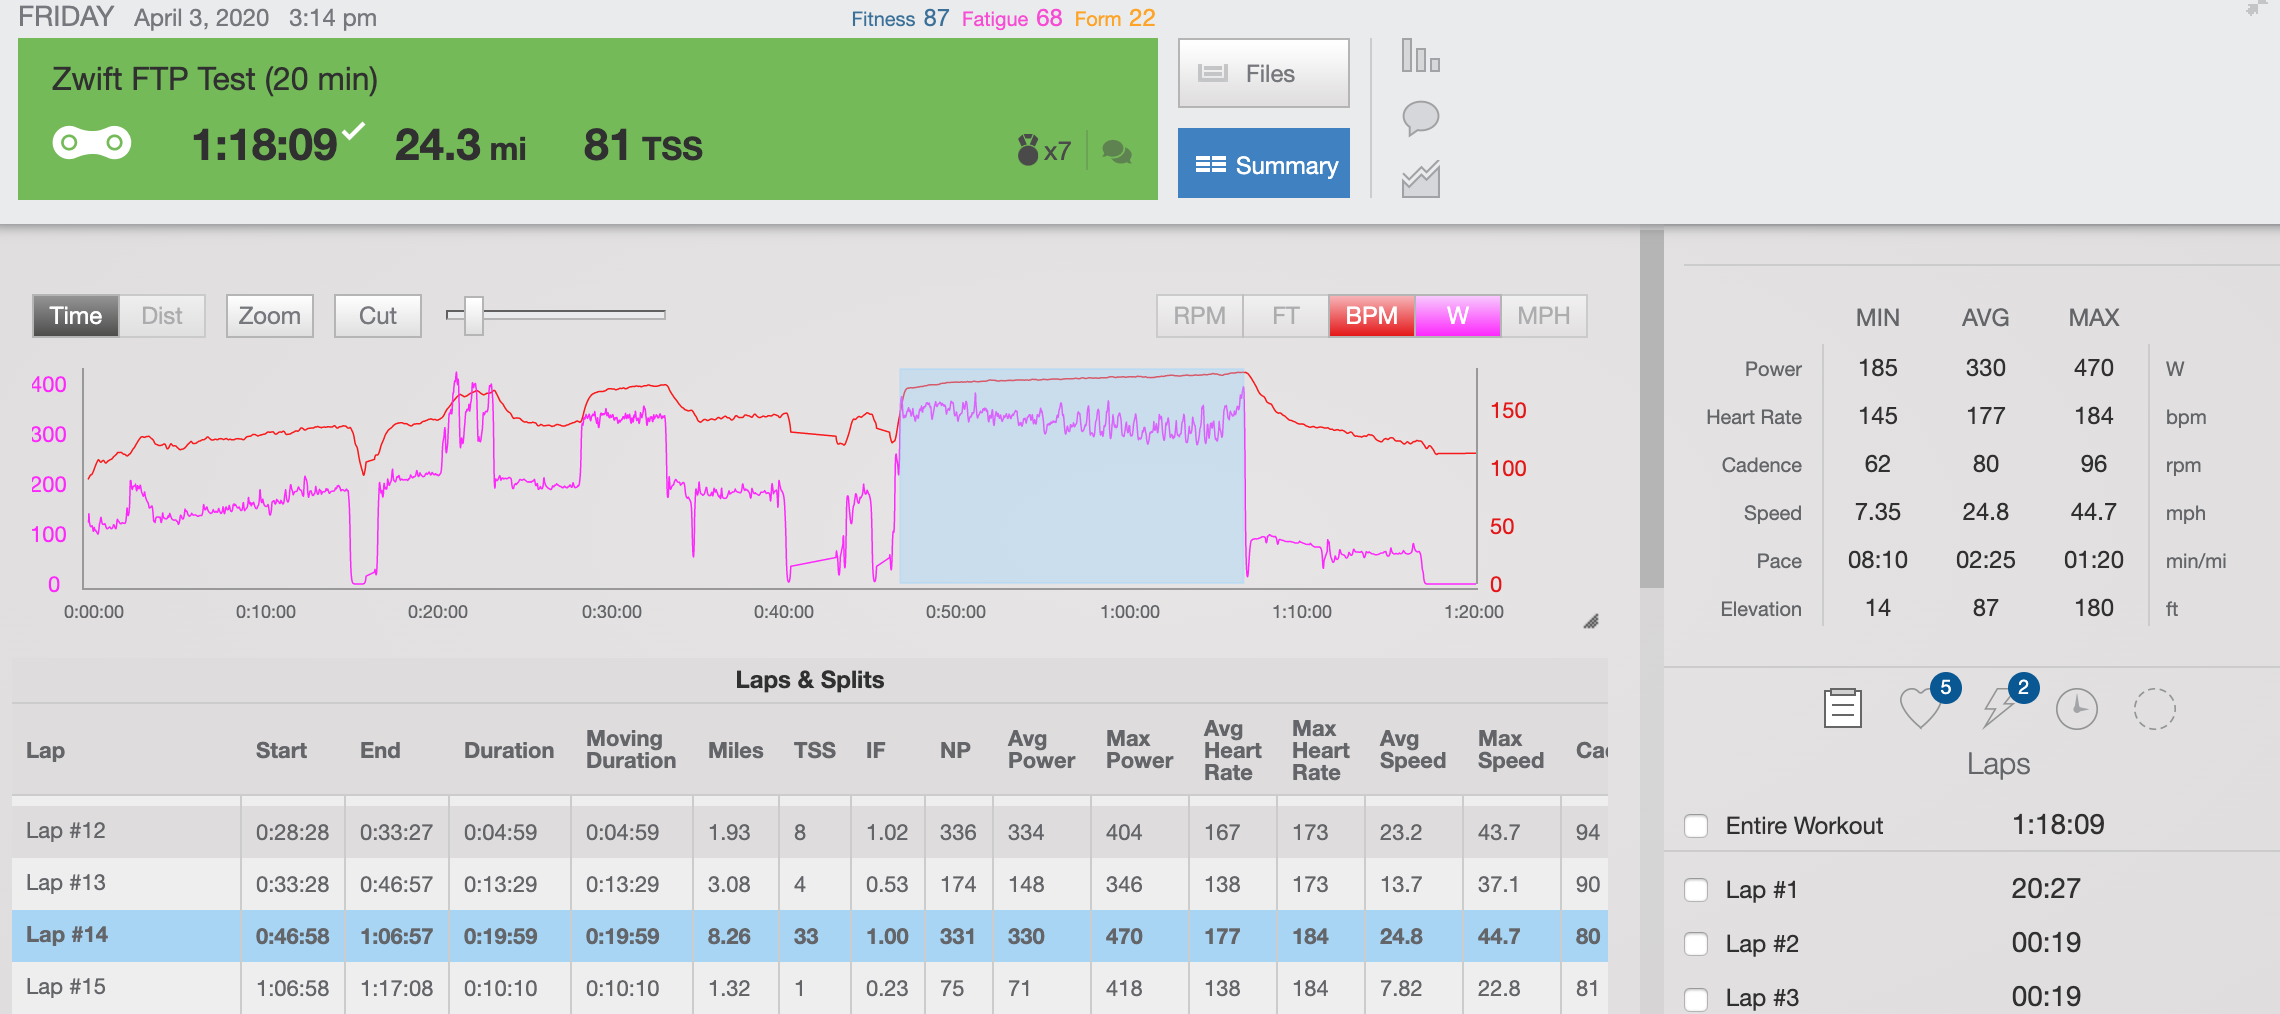
Geek Out Over The Numbers-
Remember, these are just numbers and every test is different depending on many variables. But, science and technology are super cool these days and with the help of Zwift, Strava, and Training Peaks we can really dial in the process. Once these baseline numbers are set, you have everything you need to set your heart rate and power zones and start a specific training schedule. This is the first step toward reaching your fitness and racing goals and training with purpose. See my numbers below for all the data on my last test. If you look at the Training Peaks diagram you can see I went out a bit too hard and paid for it over the course of the 2nd half of the test. However, my heart rate was a nice straight line with a little bump at the end (Max HR). Next time, I will start a bit easier and slowly increase my power output so I don’t lose as much power in the end.
X